Wednesday, July 19, 2017


July Sustainable Souls Project
Our Sustainable Souls theme for July was "Helping Nature Sustain - Honey Bees".
As soon as I saw the theme for July, I instantly knew what I wanted to do for my journal.


I started off with a scrap piece of cardboard and scraped Liquitex Gesso randomly over the one side.  I dried the gesso with a heat gun and then with a circle stencil, applied modeling paste in the middle to represent a honey comb.  After the modeling paste was dry, I applied a thin layer of Yellow Oxide acrylic paint and a wash all over the surface.


Once that was dry, I used modeling paste through a bee stencil I found on Etsy for my main image.  Once that fully setup, I used a mixture of gold, champagne and silver Inka Gold to highlight and make the bee stand out.

 
I felt the sides of the piece needed some balancing, so I used "the great equalizer", gesso (to quote my friend DeeDee Catron).  I took a pallet knife and scraped the edges and some of the circles to make them pop.


Once everything was completely dry, I mixed up equal parts of Alumilite Amazing Clear Resin and placed a few drops of Yarrow Ice Resin Tint and just a couple drops of Ancient Root Ice Resin Tint to give myself a warm yellow color.


I let this settle for a couple of minutes to let most of the bubbles disappear.
I then began to pour my resin all over the page randomly.

I let this cure for 24 hours and made up a smaller batch of the same resin combo and poured streaks around the entire page for more dimension.

To keep with my word of the year "BE", I pulled out some white rub-on letters and on the top right corner spelled out "BEe".  Last but not least I picked up my Stabilo Marks all pencil and drew some lines on each edge. I wet a paint brush and watered down the pencil marks for a grungy look.

Voila!  I have to say this is one of my favorite projects for this team.

Here is the final project and some yummy close-ups.


As I'm sure everyone has heard and read that honey bees are dangerously low and as of January 2017 they were added to the endangered species list.  There are many benefits of honey bees and the honey they produce so we need to do what we can to protect and flourish this helpful species.


Thank you for stopping by.


Friday, July 14, 2017


Pink Floyd "The Wall" Collaboration


This will be a short and sweet blog post.

For the second of three journal pages for this collaboration, I chose the song "Mother". I have to say this is one of my favorites of Pink Floyd.  This song has a different meaning to me recently than it has in the past, especially with the state our Nation is in.


The lyrics I chose are:

“Mother should I trust the government?”

“Mother will they put me in the firing line?”

“Mother am I really dying?”


When digging through my stash of vintage ephemera, I found this Roman soldier that I knew would be perfect for this song.


Here are close-up photos.


Thank you for stopping by.


Sunday, July 2, 2017


Home Décor Pillow
Hello everyone.  My post today is based on inspiration from a pillow I bought from a local Vintage Market.  It looked like it would be pretty easy to make and I already had all of the components.


I started by washing and drying some raw canvas (also known as duck cloth) 3 times to make it softer.  While they were washing, I dug through all of my fabrics, especially my eco-dyed ones.  I wanted more neutral tones with a couple of pops of color.  I started to cut some small pieces out.  I knew I wanted the word “Family” on the pillow, so I gathered a piece of muslin and stamped the word with brown staz-on ink.  After the canvas was washed, I cut 2-18x18 squares and laid out the fabrics, overlapping in a cohesive manner.  Once I got them laid out the way I liked, I pinned them down and sewed around each piece with ivory colored thread.


The one I bought had a store made insert inside that could be taken out so that the cover could be washed.  I figured I would make my insert from muslin and fiber fill.  I cut out 2-17x17 squares of muslin, pinned them together and sewed around the square leaving about ½” edge.  Make sure you leave an opening big enough to fit your hand through.  Once you are done sewing around the square, flip it inside out so that you get a clean edge.  Stuff the muslin pillow with small hand-fulls of poly-fill.  Once you get the pillow to the firmness you like, hand sew the opening shut.


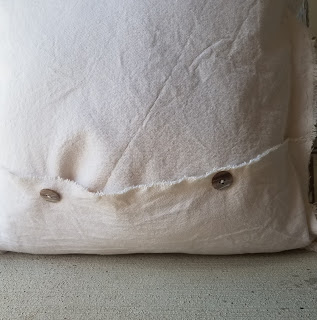
In order to be able to take the insert out, you have to create an opening in the back.  I took the back piece of canvas and cut-off the bottom 3 inches (yes, I could have made this piece initially 18x15 but didn’t think of it until this step J).  I then cut a piece 18x6 to be my “flap”. 
I wanted my finished pillow to have the “fringe”, so I laid the cover right-side out and put the 2 back pieces on the back of the cover with the smaller piece over-lapping the bigger piece.  Pin together and sew around the outside square.


Once you are done sewing the canvas cover, pick up your muslin insert and begin to stuff it into the canvas cover.


So that the back stays together and looks decorative, I added 2 buttons.


And there you have a beautiful pillow that you can either use it as a decoration or lay it on your couch.  Here are some close-up images of my final product.


 Thank you for stopping by, I hope you enjoyed my tutorial.